How to Plan a Multi-Day Hiking Trip: Routes, Campsites, Resupply and Bookings in One Place
A multi-day hike can look simple on a map: choose a trail, walk for several days, and sleep outdoors. The planning becomes more complicated when you try to answer the questions that determine whether the journey actually works. Can you reach the first campsite before dark? Is overnight camping allowed there? Where will you get water? When will you need more food? How will you get from the final trailhead back to your car?
Here is a practical way to plan a trip from first idea to a workable, day-by-day itinerary, including where an AI hiking trip planner can help and where you still need to verify information yourself.
 Also readAltitude Sickness Hiking Guide: Symptoms, Causes & Safety TipsRead now →
The quick answer: Plan the connections, not just the trail
To plan a multi-day hiking or backpacking trip, start with your dates, group abilities, and route. Divide the route into realistic daily stages, match each night to a legal campsite, identify water and food resupply, check permits, and add transportation and contingency plans. Keep everything in one dated itinerary, then verify conditions and reservations with the relevant official sources.
That sequence matters. A campsite that is beautiful but too far from the day’s trail segment is not a workable stop. A resupply shop that closes before you arrive is not a resupply plan. A permit requirement you discover after booking transportation may force you to redesign the entire trip.
1. Write a trip brief before searching for trails
Before choosing individual waypoints, agree on the constraints that should shape the whole trip:
- Location and dates: destination, available days, season, start and return times.
- Group: number of hikers, experience, fitness, pace, accessibility needs, and comfort with exposure or elevation.
- Hiking style: continuous backpacking, hut-to-hut hiking, base-camp day hikes, or a mix of hiking and driving.
- Effort: comfortable daily mileage, elevation gain, terrain, pack weight, and time available for breaks.
- Overnights: tent sites, designated backcountry camps, huts, cabins, or occasional lodging.
- Logistics: vehicle, trailhead transfers, food, water, permit deadlines, and approximate budget.
A useful brief might read: “Two adults, four nights in the northeastern United States in late summer. Moderate experience, a comfortable target of six to nine miles on most hiking days, designated campsites where required, one mid-trip resupply if the route allows it, and a return to our starting vehicle.”
 Also readHow to Plan a Hiking Route with Elevation Changes : Step-by-Step Guide with Practical TipsRead now →
This is more actionable than searching for “the best hiking trail” because it already tells you which options will not fit.
2. Split the route into realistic daily hiking stages
The critical unit in a backpacking itinerary is the day, not the total distance. For every stage, record its starting point, intended overnight stop, trail distance, ascent and descent, expected terrain, water plan, and a fallback if the day becomes too difficult.
Do not divide total distance by the number of days and assume the result is practical. Eight miles of smooth trail are different from eight miles involving steep climbs, uneven rock, stream crossings, heat, or a heavy pack. Use terrain-specific maps, guidebooks, park advice, and your group’s experience to estimate effort. Build in time for filtering water, setting up camp, navigating, and unexpected delays.
A simple planning test: If one delayed start, slow hiker, or closed trail segment would make the planned campsite unreachable before dark, the day needs more flexibility.
 Also readBest Solo Hiking Routes: Safe, Scenic & Beginner-Friendly Trail GuideRead now →
3. Match every night to a legal campsite and permit
Once the rough stages make sense, check the overnight plan before treating the route as settled. Each proposed campsite needs a clear status:
- Is camping allowed at that location and on that date?
- Is it a designated site, an area with dispersed-camping rules, or a reserved backcountry campsite?
- Is there a required permit, quota, lottery, or site-specific reservation?
- What restrictions apply to group size, campfires, food storage, and water access?
- What alternative overnight site is practical if the first choice is unavailable?
Use the relevant park, forest, or land-management authority as the final source of truth. In the United States, Recreation.gov handles reservations for many participating federal recreation sites, but not every trail or permit. In Canada, Parks Canada’s backcountry camping information explains that systems and site requirements vary by destination.
Important: A mapped campsite is not the same thing as a confirmed campsite reservation. Keep “proposed,” “available,” “reserved,” and “confirmed” separate in your planning notes.
4. Plan water and food resupply as part of the route
Water sources and resupply opportunities should be attached to specific hiking stages, not collected in a separate list that nobody checks again.
For each day, record the last confirmed water source, expected water needs, the next verified source, and your treatment method. A stream shown on an older map may be dry or unsafe to access. Check recent conditions through land managers or reliable trail-specific sources. Carry the capacity needed for your route and conditions, including contingency water where appropriate.
Food works the same way. For a short trip, it may be simplest to carry everything. On a longer section hike, you might use a trail town, an authorized food cache, a mailed package, or a prearranged pickup. Before including a stop in your plan, confirm that the service exists, is open on your arrival date, has the supplies you need, and is actually reachable from the trail.
Build a food inventory around the days between reliable resupply points, not just the advertised duration of the trip. Add a margin for delays appropriate to your route, conditions, and experience.
5. Connect trailheads, transfers, transport and bookings
Hikers often plan the beautiful middle of the trip while overlooking how they will arrive and return. Treat these as itinerary stages too:
- Arrival time, the road to the trailhead, parking restrictions, and any required shuttle.
- Permit collection location and operating hours.
- The last sensible place to buy food, fuel, and other supplies before the trail.
- Transfers between trailheads for point-to-point routes.
- Accommodation before or after a long hike, if needed.
- Booking references, operator contact details, and cancellation rules.
This is particularly important for hiking itineraries that include several parks, road-accessed trailheads, or nights in different accommodation types. If a shuttle is available only at certain times, that constraint may determine which direction to hike.
6. Build one connected itinerary: an illustrative five-day example
The table below is a hypothetical planning example, not a recommended real-world route. Its purpose is to show how each decision depends on the previous one. Exact mileage, terrain, campsites, services, and permissions must be established for the destination you actually choose.
| Day | Proposed hiking stage | Overnight or resupply | What must be confirmed |
|---|---|---|---|
| 1 | Start trailhead to Camp A, roughly 5 to 8 miles | Camp A | Trailhead access, overnight rules, campsite permit and first reliable water |
| 2 | Camp A to Camp B, roughly 6 to 9 miles | Camp B | Ascent, terrain, water availability and legal campsite location |
| 3 | Camp B via a potential resupply town or pickup point, roughly 5 to 8 miles | Food resupply and Camp C | Store hours, access to the trail, feasibility of the detour and Camp C permission |
| 4 | Camp C to Camp D, roughly 6 to 9 miles | Camp D | Weather exposure, bailout options, food remaining and overnight rules |
| 5 | Camp D to exit trailhead, roughly 4 to 7 miles | Return transport | Pickup or shuttle, road access and return time |
The “connected” part is the important part. If Camp B becomes unavailable, you need to review the distances and water plan for Days 2 and 3. If the resupply point closes, your food carry changes. If the exit shuttle is canceled, the final day and return journey need a backup.
A spreadsheet can hold this information, but it will not necessarily help you see how a change to one stop affects the rest of the trip.
7. Choose the right tools for the job
Different hiking tools answer different questions. They are complementary rather than interchangeable.
| Planning task | Useful type of tool | What to check independently |
|---|---|---|
| Discover trail options and reviews | Trail-discovery tools such as AllTrails | Current trail status and whether reviews describe your season |
| Evaluate terrain and prepare offline navigation | Topographic or offline mapping tools such as Gaia GPS or CalTopo | Downloaded map coverage, route accuracy and navigation skills |
| Investigate long-distance trail services | Trail-specific guides such as FarOut | Recent water reports and resupply business hours |
| Confirm campsites and permits | Official park or land-agency booking systems | Reservation and permit status |
| Connect all days, stops and logistics into one trip | An itinerary planner such as Xploreum | Any suggested detail that depends on live conditions or availability |
A practical workflow uses an itinerary for coordination, specialized tools for navigation, and official sources for legal and safety-critical decisions. Do not expect a general-purpose AI chat response to replace a verified map or a permit confirmation.
8. How an AI hiking trip planner can reduce the coordination work
This is where Xavier by Xploreum can help. Instead of manually assembling every stage from scratch, you describe your trip in everyday language. Xavier asks follow-up questions about the details that change the plan, such as dates, departure point, group size, budget, vehicle, activity, and desired pace.
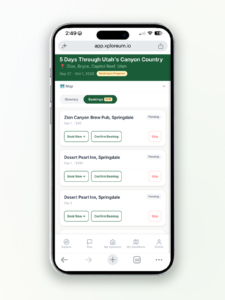
After you approve the trip summary, Xavier proposes a day-by-day Xpedition with the hiking route and relevant stops arranged on an interactive map. Depending on the trip, those stops can include trailheads, campsites, food or fuel stops, accommodations, activities, and local services. You can review the proposed days, ask for changes, and keep the connected trip together.
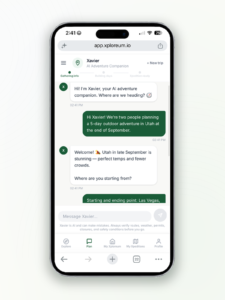
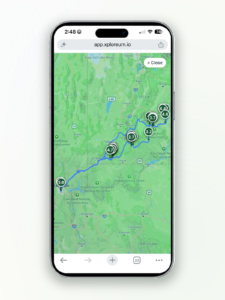
For a concrete demonstration, Xploreum can show a multi-day trip with mapped driving and hiking legs, proposed overnight stays, and day-by-day itinerary details. Its interactive route map displays the connected route and numbered waypoints.
A prompt you can adapt
Plan a five-day hiking and camping trip for two adults in [destination] during November. We can comfortably hike [distance] per day on moderate terrain. Include trailhead access, a realistic daily schedule, legal campsites to verify, water and food resupply considerations, and a way back to our vehicle. Flag any permits, reservations, or uncertain details we need to confirm. Keep the days connected, and ask me about missing information before building the itinerary.
A good prompt defines constraints and asks the planner to flag uncertainty, rather than invent certainty. Change the destination, hiking difficulty, trip style, and overnight preferences to fit your needs.
You can build and save an initial Xpedition for free. Xplorer Pro unlocks the full itinerary, more extensive editing and sharing features. That distinction matters if you are comparing hiking trip planning apps before subscribing.
What Xploreum does not do yet
Xavier does not complete campsite reservations or permit payments for you. You make those bookings through the provider or managing agency, then record the confirmation details in your Xpedition. It also does not provide native offline trail maps or live water and trail-condition verification. Use a suitable offline navigation app and recent, authoritative local information before heading out.
9. Review safety, uncertainty and environmental impact before departure
A completed digital itinerary is a planning document, not a guarantee that every trail, water source, or overnight location will be safe or open. Before leaving:
- Recheck weather, wildfire and fire restrictions, trail and road closures, river crossings, and seasonal hazards.
- Reconfirm legal campsite access, permit conditions, shuttle or lodging bookings, and your ability to reach the exit.
- Download offline maps, check navigation equipment, and know how to navigate if electronics fail.
- Carry appropriate water treatment, food, shelter, clothing, first aid and other essential equipment.
- Plan alternatives for bad weather, injury, fatigue, unexpected delays and missed transport.
- Share an itinerary, expected return time and check-in plan with someone who is not on the trip.
- Follow the relevant food-storage, wildlife and Leave No Trace rules.
The National Park Service trip-planning guidance emphasizes current conditions, backup plans and the Ten Essentials. Leave No Trace likewise treats advance preparation as a foundation for responsible outdoor travel. If you are hiking with others, HikeSphere’s group hiking safety guide covers additional group considerations.
Multi-day hiking trip planner: frequently asked questions
What is the best way to plan a multi-day hike with campsites?
Choose a route suitable for your group, divide it into realistic daily hiking stages, and match each stage to a legal and available campsite. Add water, food, permits and transport to the same dated itinerary. Verify campsite permissions with the managing agency before treating the plan as confirmed.
Is there an AI trip planner for backpacking routes and campsites?
Yes. An outdoor-focused planner such as Xavier can help structure a backpacking itinerary around your dates, pace, trailheads, proposed campsites and resupply logistics. Treat generated locations and conditions as planning suggestions until they are verified.
Can I plan trailheads, campsites, and resupply stops in one place?
Yes. Keep them in one connected itinerary, with each stop assigned to a specific day and route segment. An AI-assisted Xpedition can help organize the sequence, while official booking systems and specialist mapping tools provide the independent checks.
Do I need multiple apps to plan a backpacking trip?
Not necessarily for the itinerary itself. One main planning workspace can keep the days and logistics together. For safe backcountry travel, however, you may still need an offline mapping tool, an authoritative permit source, and current local trail and water information.
Can Xploreum book campsites automatically?
No. Xploreum can help organize suggested stays and booking tasks, but you still make and confirm reservations directly with the provider or managing agency. You can then keep the booking information linked to the trip.
Is Xploreum free to try?
You can begin building and save an Xpedition for free. Access to the complete itinerary and advanced features requires Xplorer Pro. Review the current subscription terms before upgrading.
Final thought: Turn the plan into a trip you can actually take
The hardest part of a multi-day hike is often not selecting the trail. It is making the daily mileage, campsites, water, food, permits, transportation, and bookings agree with one another. Start with those connections, verify the critical details, and keep one updated itinerary for the whole group.
Ready to turn your hiking idea into a connected itinerary? Start planning with Xavier. Describe where you want to go, your dates, your group and your hiking style, then review the proposed Xpedition before deciding whether Xplorer Pro is right for you.
Author disclosure: Hadis Hesabi is the co-founder and CTO of Xploreum, the outdoor trip-planning platform discussed in this article.

Rajat Pathania is a hiking enthusiast who studies trails, hiking safety, and outdoor preparation. He shares practical insights based on field experience, gear testing, and research about trekking conditions. His work focuses on helping hikers understand trail planning, safety practices, and essential hiking skills for better outdoor trips.